
How to Build A DIY Fireplace Surround for Your Electric Insert
This page may include some affiliate links, meaning that at no cost to you, I could earn a commission if you purchase through these links. Learn more. As always, I only link items that I personally use and recommend. Thank you for your support by shopping through my links.

In Arizona, it’s not that common to find a house that has a fireplace in it. So after enduring years of having nowhere to hang my Christmas stockings and drooling over pictures of decked out mantles and cozy fireplaces, I knew it was time to build my own fireplace before Christmas!
I had never built anything of this magnitude before. I mean, this is an actual structure! A focal point in my home that everyone would see. I admit it was intimidating to consider tackling this project but my goal was clear so there was no stopping me.
But where to begin?
First, I started by gathering inspiration, and after hours on Pinterest I decided on the look I was going for.
Once I figured out what I wanted it to look like, I needed to decide on the size. So, I picked out the fireplace insert and went with this Pura Flame Electric Insert. This insert was more traditional in look and shape but it wasn’t completely square. It was perfect.
Then I had to determine the overall size and placement. We were lucky there was an outlet right in the middle of our living room wall, so I picked that as the center and measured out from there and marked the wall with tape where I felt it was the right size for the room.
If you don’t have an outlet where you want to build your fireplace, I recommend hiring an electrician to install an outlet inside your fireplace framework.
For my fireplace surround, I went with 69 inches wide and 15 inches deep. I chose 15 inches because I wanted enough depth to add built ins later but also I didn’t want it sticking into the room too much. This size fell right for my space. When planning, try to line up the edges of the frame structure with studs in your wall, this will make securing the structure to the wall much easier, see step 7 below for more.
Please note that all the information below is based on my build and sizing. You may alter any sizing and measurements as you need to fit your space.
What you’ll need:
2×4 10 ft long Kiln Dried Wood (13)
Total Cost: $706.30
**Cost may vary based on local pricing and exact material and quantities used.
We also chose to purchase a Samsung Frame TV to complete the look we were after. Since this is not necessary for this project, it was not included in the cost. If you are wanting to add one as well, here is the one I have, and here is the frame color I have.
For a video walkthrough of this project, check out my Instagram highlight here.
For my floating wood mantel tutorial, click here.
For my updated mantel tutorial, click here.
Step 1: Framing
1. Mark your lines on the wall where your framing will go. You can use this to line up your 2x4s. Keep in mind that the final fireplace will be about an inch larger than the framing to account for the drywall, joint compound, etc.
2. Notch out your baseboards where the fireplace studs will go on the wall. I did this using my multitool and a pry bar. Cut out enough space to fit a 2×4 and the 1/2 inch drywall, so about 4 inches – 4.24 inches for some wiggle room.
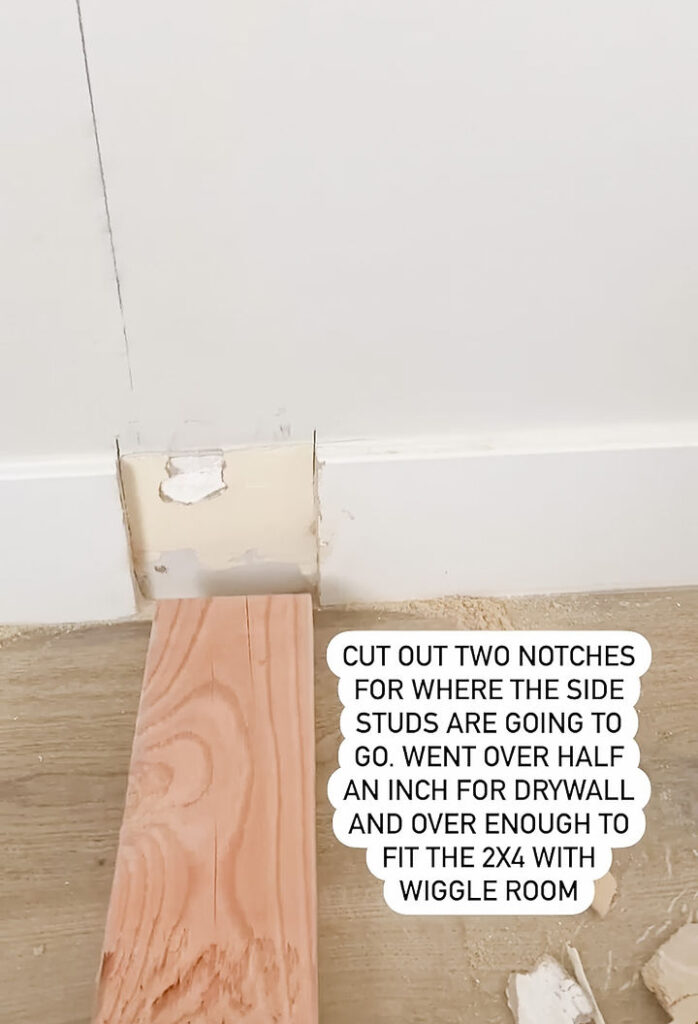
3. Build the outside studs for the fireplace.
4. I did this by taking the height of the wall (mine is 9 ft) and cut 2 2x4s to this length, minus the depth of 2 2x4s. (Depth of a 2×4 is 1.5 inches so 1.5 X 2 = 3. 9ft (108 inches) – 3 inches = 105 inches. Then I cut 2 2x4s to the depth of the fireplace, 15 inches.
5. Screw these two 15 inch pieces into the bottom of the 105 inch pieces. This rectangle will be the two sides of the fireplace.

6. Now you need to get these side pieces in place. Stand them up vertically and line them up with the line you drew on the wall. Note: these are made to fit snuggly and will likely need to be tapped into place with a rubber mallet or hammer.
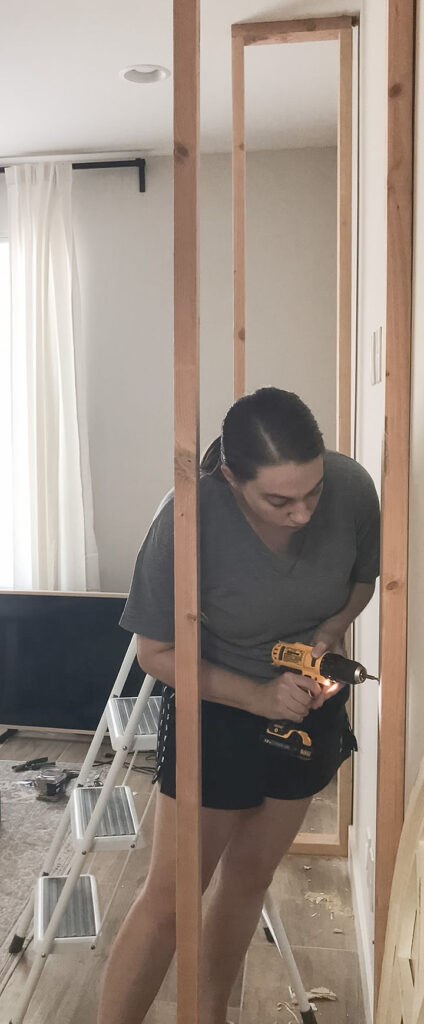
7. Once in place with your line and level, screw them into the wall stud using 2.5 inch wood screws. If yours does not line up with a wall stud, you can screw them into the ceiling top plate and into your floor. (I have tile floors so this was not an option. When planning my fireplace size, I made sure these side pieces would line up with studs inside my walls.)
8. Once these are screwed into place, use your level and speed square to ensure everything is still level and square before proceeding.

9. Measure the inside distance between these side walls at the bottom and top. Cut 2x4s to these measurements and attach at the floor and ceiling between the two walls. These will be your front plates.
10. Next you need to determine how high you want the fireplace insert to be off the ground. I landed on 10 inches. You need to build a platform at this determined height for your insert to sit on. I cut 8 pieces of 2×4 to 7 inches long. Cut 3 pieces of 2x4s to the same length as your bottom front plate.
11. Next, screw 4 of the 7 inch pieces into your front plate, spread out across its length. Once attached, take one of the longer pieces that’s the same length as your front plate and lay it on top of these 4 pieces and screw it down into them.
12. Now repeat these steps to create the back support, with one longer piece on the floor between the two side walls, mimicking your front plate, and four 7 inch pieces screwed into that, and then one longer piece on top screwed into the 4 pieces. These should not be touching; one will support the front of the insert and the other will support the back.
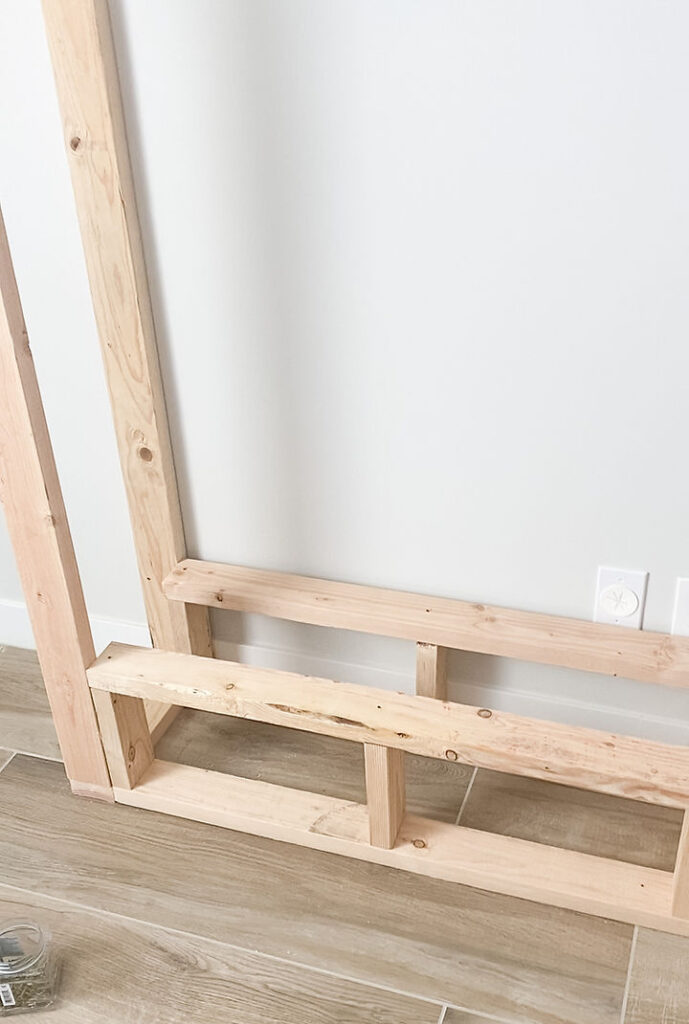
13. At this point, set the insert on the platform you’ve created. Ensure that the insert is sitting level and that you still like the height.
14. With the insert centered on the platform, measure from the top of the platform to the top of the insert. Make sure you are not measuring to the top of the insert trim, but to the top of the portion that will be sitting inside the fireplace. This distance for me was 25 1/2 inches. Since the insert can get warm, I added 1/4 inch to this measurement so the wood isn’t resting directly on it. This makes the measurement 25 3/4 inches.
15. Cut 4 2x4s to 25 3/4 inches. Attach one to the front inside of the left stud, and one to the right stud. Set the other two pieces to the side until after the next step.
16. Cut a 2×4 to the width between the studs, and attach it to the top of the two 25 3/4 inch pieces you just installed
17. Now take the other set of 25 3/4 inch pieces you set aside and place them on each side of the insert. You’ll want it to fit snug but leave some wiggle room to be able to take the insert out and for airflow. Once these are secure, remove the insert and set it aside for the rest of the build.
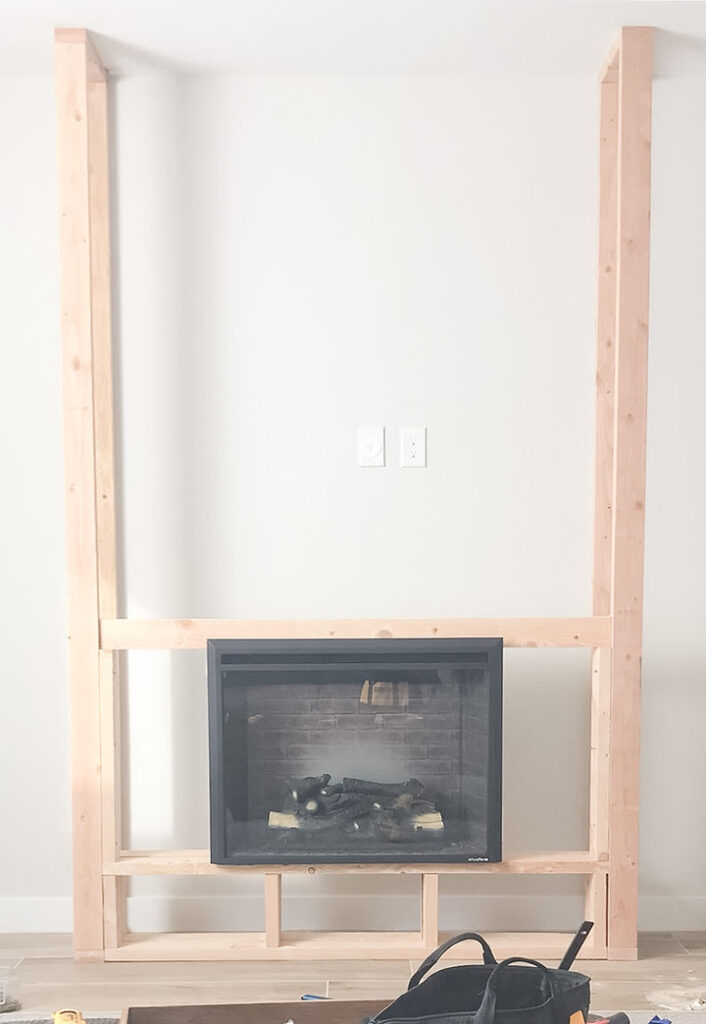
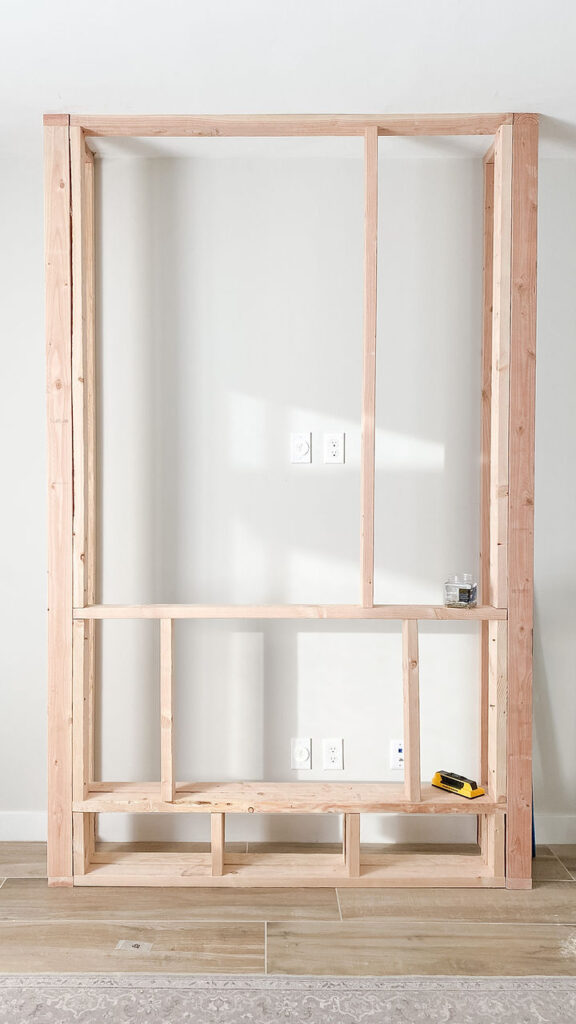
18. Measure the distance between the board you just secured above the insert in step 15, and your top plate. Cut 4 2x4s to this length. Secure one to the inside of the left stud and one to the right. The other two will be centered in between the previous two.
19. Finally, if you plan to mount a mantle or a TV, you’ll need to create studs to mount them to. Decide how high you want the TV and the mantle. Then, measure the distance between the vertical pieces from step 15. Cut 2x4s to this distance and secure them at the height for the mantle and TV mount.
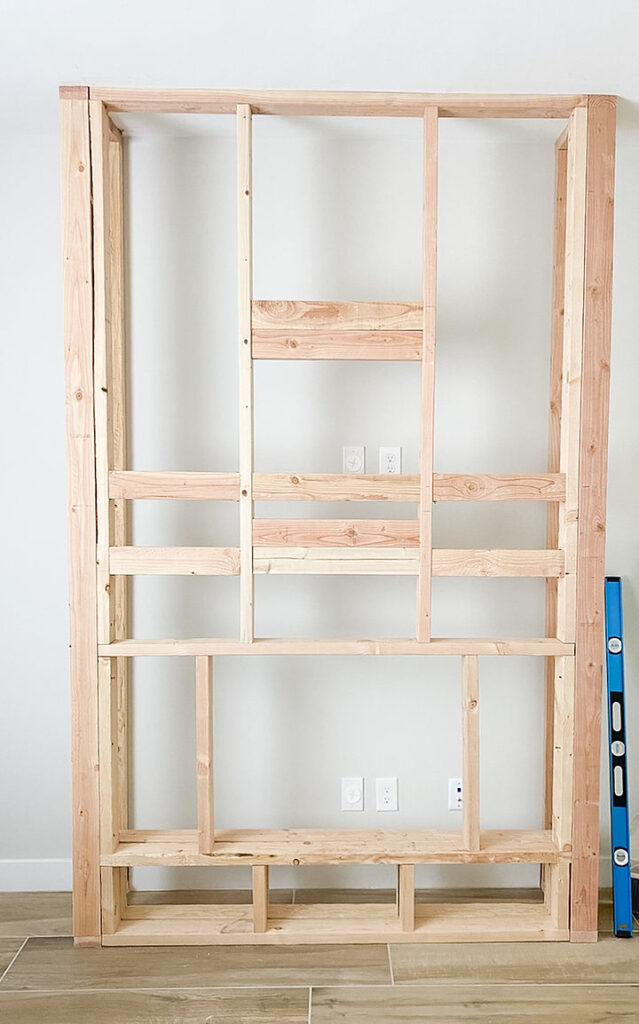
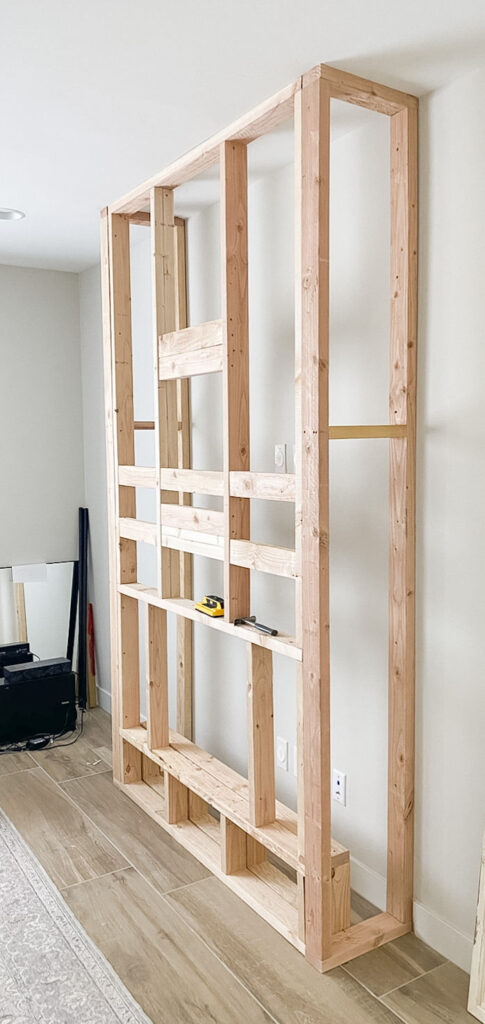
20. Optional: You can also create a shelf for any TV components to sit on if you need to. We opted against this as we planned to eventually snake the components into future built in cabinets next to the fireplace. If you choose to make a shelf, you can screw 2x4s to the piece from the above step and attach a 1×8 cut to length to the 2x4s to create a shelf.
NOTE: As seen in the above photo, I did decide to go back and add a 2×4 horizontally in each of the original side studs of the structure from steps 3 and 4 for added support. I just cut a 2×4 to the inside distance between the two longer boards and secured them with wood screws.
Step 2: Drywall
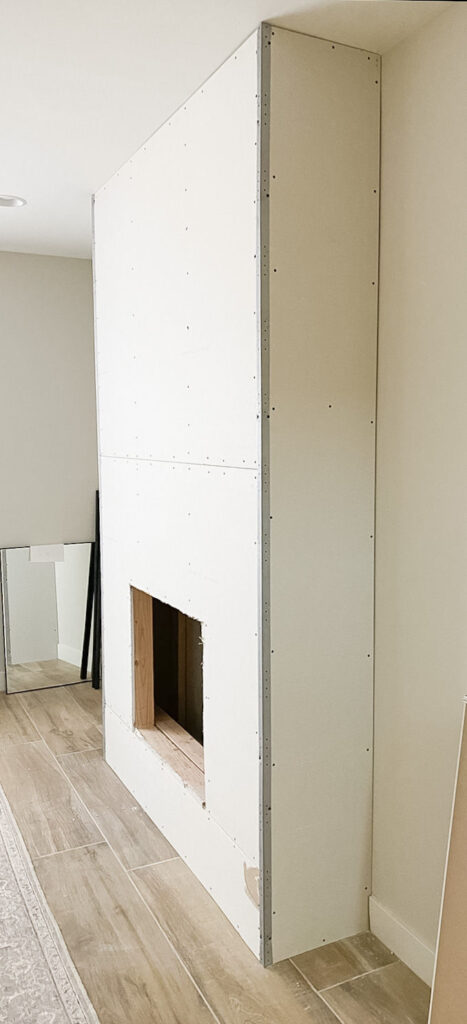
21. Typically drywall sheets come in 4×8 ft sizes. I wanted to minimize the number of seams, since my ceiling is 9ft tall, so I ordered 4×10 ft sheets and had them delivered to my house. I used one sheet for the two sides, and two sheets to cover the front.
22. For the sides, I cut the length down to 9 ft, and then cut two pieces from that which were each 15 inches wide.
23. To cover the front, I cut out 2 4 ft X 69 inch pieces and stacked them on top of each other horizontally. The remaining uncovered portion was 69 inches across and 12 inches high, so I cut a piece to those dimensions.

24. In order to cut out the opening for your TV components (if needed) and for the insert, have one person hold the drywall up to the frame where it will be attached while the other reaches inside the frame with a pencil and traces the outline of the opening. Take it outside and cut out the hole you drew. I used my Jigsaw to cut this hole.

25. Now hold up the pieces to the frame and screw them in to the studs using 2 inch drywall screws. Make sure to slightly sink the screws just below the surface of the drywall. Continue until all the drywall is attached. You want to use several drywall screws down the length of each stud – space them approximately 12 inches apart. I got a little carried away and put mine a tad too close together, no big deal, just more holes to cover!
26. Next up is attaching the corner bead. Again, this normally comes in 8ft lengths but I didn’t want to have to match this up, so I ordered ones that were 10ft long and had them delivered with the drywall. Using wire snips, I cut them to 9ft in length, careful not to bend them our of shape in the process.
27. Hold the corner bead up to the corners, being gentle not to warp or bend as you put it in place. Attach with drywall screws every several inches. Do not sink the screws too deep here, or the corner bead will bend. Everything will get covered and smoothed out by the joint compound.
Step 3: Taping & Mudding
28. Before you start, make sure to protect your floor. Put down paper or plastic to cover the area you will be working over. This stuff gets messy!

29. Using a trowel or putty knife, smear joint compound over your seams (work one at a time to make sure it doesn’t start drying before you can work with it). You’ll want to spread enough to cover the area where the seam is as well as a few inches above and below, but don’t want it globbed on.
NOTE: I recommend using a mud bucket for the joint compound. Scoop out some joint compound into the bucket and carry this around to scoop out new mud from and use the edge to keep your putty knife clean. Here is the one I used.
30. Then cut some paper tape to the length of the seam. Fold the paper in half long ways (it should have a perforated fold already). Line that crease up with where your seam is. Using your putty knife gently but firmly press the tape into the mud, squeezing out any excess and wiping it smooth, but not pressing so hard that it all gets pressed out.
31. Once the paper is adhered, take some more joint compound and spread it over top of the tape, making sure to cover it completely, especially the edges. Your goal here is to get the tape “wet” with mud. Again run your putty knife over top of this to smooth everything out. Make sure the tape it nice and smooth and not bumpy or lumpy or you will forever be able to see it. You want the tape covered, but the coat light enough that you can still somewhat see the tape.

32. Repeat this for all of your seams.
33. You’ll also want to fill all of the screw holes with joint compound as well. Use your putty knife to fill these holes and smooth them out to minimize how much sanding you’ll need to do later. You will likely need to do a second coat to all the screw holes once they dry, and the joint compound can shrink as it dries.

34. Finally you’ll need to cover the corner bead with joint compound. Spread the joint compound over the corner bead, one side at a time, and smooth it out with your trowel or putty knife, making sure all the metal is covered and continue spreading the joint compound out a few inches past where the corner bead ends to better blend it into the drywall.
NOTE: I did not use tape and mud on the seams where the fireplace meets the wall. I used caulk to finish those seams. as well as the seams where the drywall meets the ceiling.
35. Once everything has dried, take a damp sponge and gently work it over the dried joint compound. This helps to knock off and smooth down any extra build up while minimizing dust.
36. If you still have places that need to be smoothed out, take a 220 grit drywall sanding screen and sand down those areas. Caution: you will get covered in dust. I advise wearing a mask and protective eyewear.

37. If you have any areas that need to be filled, you can use your putty knife and fill them with joint compound or use spackle to save on dry time if its a small spot.
38. Next, you’ll need to prime the fireplace before painting. Make sure to use a primer that is for use on bare drywall. This is the one I used.
39. Now it’s time to paint! I used Behr Ultra White paint in a matte finish, but you could also use an eggshell finish. Used a 12 inch 3/8 nap roller. Check out this blog post for my painting tips, wish I had followed my favorite tip from here when painting this fireplace, and it would have gone a lot quicker!

Step 4: Wrap Up
40. It’s finally time to put your insert into place. Simply plug it in and slide it into place. If needed, use shims to adjust.
41. Mount your mantel, making sure you are securing it to the studs you created for it. Check out my blog for how I built my mantel here or my updated mantel here.
42. Mount your TV. Follow the directions that come with your TV mount, but make sure you are screwing into the studs you created for it.
Wow! You did it!
Now sit back, relax, and enjoy your amazing and cozy new fireplace. You earned it! Have a hot cocoa for me!
Make sure to share your new fireplace with me on Instagram @handtreatedhome. I would love to see it!
Questions or Comments? Leave a comment below or send an email to hello@handtreatedhome.com!



Your build is beautiful but how did you plug your tv into the power outlet?
Thank you! I ran the cable into the fireplace and then plugged it into the plug in the wall.