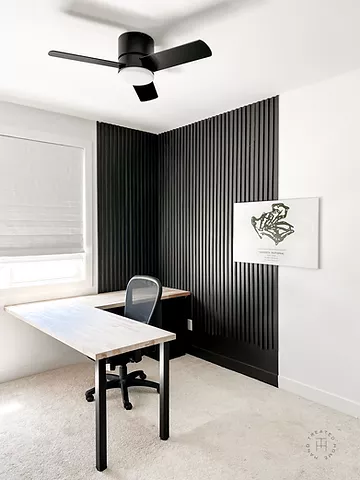
DIY Modern Slat Feature Wall
DIY Modern Slat Feature Wall
This page may include some affiliate links, meaning that at no cost to you, I could earn a commission if you purchase through these links. Learn more. As always, I only link items that I personally use and recommend. Thank you for your support by shopping through my links.

Modern Slat Feature Wall
I’d been looking for a place in my home to do a slat wall for what felt like forever! I love the simple and modern look that it gives, but couldn’t quite figure out where it would fit
in to my more transitional design.
Luckily, my husband loves the minimal and sleek modern aesthetic, and his office needed a makeover.
Need I say more?
Here’s what you’ll need:
1/2 X 3/4 in Pine Trim
Brad Nailer Brad Nails Primer Paint (I used Clare Paint in the color blackish for the accent wall, and in Snow Day for the rest of the room) Paint Sprayer (Optional) Roller Roller Frame Painting Pole Paint Tray Paint Liner Paint Brush Caulk Caulk Gun Wood Filler Sander Paintable Outlet Cover
If you prefer video walkthrough, check out the entire project here and the video tutorial here.
I partnered with Woodgrain for the trim needed for this project. I have used this trim previously in my Dining Room, for the inset trim in my Bedroom and in my Office. It’s my favorite and most versatile trim with a modern look!
Step 1: Paint
Before you begin with the trim, you need to paint the wall whatever color you want the finished look to be. Even if you want to paint the slats once they are on the wall instead of before putting them up, trust me it’s easier to just paint the wall first so you don’t have to go in with a tiny paintbrush to do the edging between each piece of trim.
TIP: If you are sectioning off part of a wall, like I did, and need to tape off the section, here is my trick to prevent paint bleed. Once you tape off the area, and press the tape down really really well, go over the edge of the tape with the EXISTING wall color. This will fill any gaps in the tape (and works great for textured walls!)
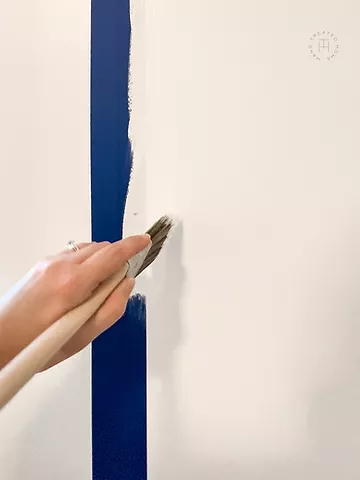
Paint over tape edge with existing wall color to seal and fill gaps
Step 2: Paint the Trim
There are actually two ways to do this. You can paint the trim before putting it up. I painted mine with my paint sprayer, but you could also roll them if you prefer. OR you can paint them after putting them up. There are pros and cons to both methods, let me break it down.
Painting before installing:
This way is less tedious. You can spray or roll the paint on fairly quickly before installing. However, the downside is that there is a lot of setup involved to paint the off the wall. I almost didn’t have enough room in my garage to paint them all at one time. The other downside is that even if you go through all the trouble to paint first, you will still need to do touch up paint once they are installed on the wall. This is because you have to fill nail holes and paint over the caulk.
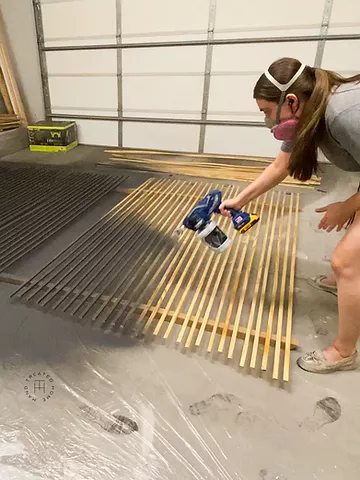
Use paint sprayer to paint all trim at once before installing
Paint after installing:
More tedious because you would need to be very detailed to paint the trim near the ceiling and the floor, and be more precise. The benefit is you don’t need a place to lay out all the trim to paint it, because it’s on the wall. Additionally, you can nail it up, caulk, and then wood fill, and THEN paint in one fell swoop.
So there you have it, both have pros and cons, just pick which set sounds best to you. I chose to spray the trim before installing, and then just do touch up paint after patching holes. I am happy with my choice so take that for what you will.
Step 3: Install the trim
To install the trim, you are just going to nail it to the wall with a brad nailer (no glue! If I teach you anything, do not glue trim to your drywall. If you ever want to remove it you will curse the day you bought that tube of glue) This is lightweight trim, nails and caulk will hold it up just fine.
You’ll also need to decide on the spacing you want between each piece and create a spacer. I decided on 1.5 inch spacing, so I just used a scrap 1×2 board as my spacer (Remember, wood sizes don’t necessarily match the product description – so don’t use a 1×2 for a 2 inch gap, because it’s really .75” x 1.5”!)
TIP: You can place a couple screws in the spacer to act like a handle to make it easier to pull out from between the trim pieces once they are nailed into place.
You’re also going to need to cut each piece of trim to length. Most walls are wonky, so you may have to measure and cut each piece in order for it to fit.
The trim pieces are 8 ft long and my walls are 9 ft tall . For the boards that came down and met the desk, I measured from the top of the desk to the ceiling and cut them to that length. Then just repeat placing the trim on the wall, making sure it is level (especially important for the first piece!) Nailing it into place, and then spacer, trim piece, nail repeat.
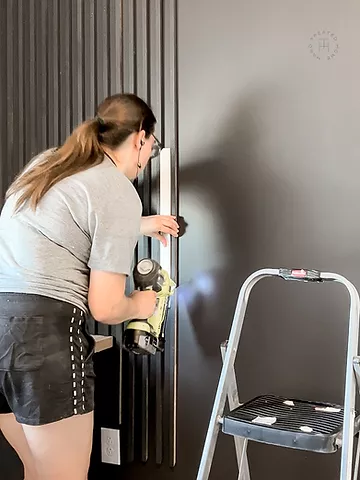
Use spacer board to get a consistent gap, then use brad nailer to nail up trim
For the pieces that are too short, I needed to do a scarf joint. This is where you cut two pieces of trim at and angle, so that they line up and join together more seamlessly. Then just wood fill the joint, sand, and paint over it and you’ll never know!
Step 4: Finishing Work
Once all the pieces are up, you need to go back and fill the nail holes with wood filler. Then sand them down once dry, and then paint over the holes.
You’ll also need to caulk the edges of the trim where they meet the wall. Depending on how close together you put the trim, you may want to do this as you go if they are close enough that you would struggle to fit the caulk tube in the gap.
Check out my quick tutorial on how to caulk here.
Confession: Since I painted my wall black I didn’t caulk. Please don’t tell on me.
What I love about this project too is that is can look SO different just by tweaking a few things. You can change the color, the spacing of the slats, or the width of the slats (I see a lot of people use 1×2 boards instead of the 1/2 X 3/4 inch that I used)
And that’s it! This project is a bit tedious but ultimately very beginner friendly, and you’ll get to practice a lot of basic skills that you’ll use time and time again!
Tag me on Instagram @handtreatedhome so I can see your slat walls!
Questions? Email me at hello@handtreatedhome.com or feel free to leave any questions or comments below!

